.PNG) |
MASINDE MULIRO UNIVERSITY OF
SCIENCE & TECHNOLOGY ECE 422 - DATA COMMUNICATIONS & COMPUTER NETWORKS LAB 01 - Develop dynamic HTML, XML and Document Type Definitions |
|
![]() EXERCISE 1 - Create a
basic HTML Page
EXERCISE 1 - Create a
basic HTML Page
![]() EXERCISE 2 - Creating a HTML file without all required Tags
EXERCISE 2 - Creating a HTML file without all required Tags
![]() EXERCISE 3 - Creating an XML Document that contains your mailing address
EXERCISE 3 - Creating an XML Document that contains your mailing address
![]() EXERCISE 4
- Creating an XML Document that stores data
EXERCISE 4
- Creating an XML Document that stores data
![]() EXERCISE 5 - Introducing a case error into the books.xml document
EXERCISE 5 - Introducing a case error into the books.xml document
![]() EXERCISE 6 - To add two <book> elements to the books.xml file
EXERCISE 6 - To add two <book> elements to the books.xml file
![]() EXERCISE 7 -To modify the books.xml file to include nested elements
EXERCISE 7 -To modify the books.xml file to include nested elements
![]() EXERCISE 8 - To add a publisher attribute to each of the
EXERCISE 8 - To add a publisher attribute to each of the
![]() EXERCISE 9 - To add a publisher attribute to each of the <book> elements
EXERCISE 9 - To add a publisher attribute to each of the <book> elements
![]() EXERCISE
10 - To create a document that uses the Transitional DTD
EXERCISE
10 - To create a document that uses the Transitional DTD
![]() Exercise 11 - To start creating the home page for the Don’s Pizza Web Site
Exercise 11 - To start creating the home page for the Don’s Pizza Web Site
![]() Exercise 12 -To start creating the home page for the Don’s Pizza Web Site
Exercise 12 -To start creating the home page for the Don’s Pizza Web Site
![]() Exercise
13 -To add comments to the DonsPizza.html file
Exercise
13 -To add comments to the DonsPizza.html file
![]() Exercise 14 - To
validate a file
Exercise 14 - To
validate a file
![]() Exercise 15 - To start creating the home page for the Central Valley Farmers
Market Web Site
Exercise 15 - To start creating the home page for the Central Valley Farmers
Market Web Site
![]() Exercise 16 - To add standard attributes to the Central Valley Farmers’
Market home page
Exercise 16 - To add standard attributes to the Central Valley Farmers’
Market home page
![]() Exercise 17 - To add heading elements to the Central Valley Farmers’ Market
home page
Exercise 17 - To add heading elements to the Central Valley Farmers’ Market
home page
![]() Exercise 18 - To add section elements to the Central Valley Farmers’ Market
home page
Exercise 18 - To add section elements to the Central Valley Farmers’ Market
home page
![]() Exercise 19 - To add header and footer elements to the Central Valley
Farmers’ Market home page
Exercise 19 - To add header and footer elements to the Central Valley
Farmers’ Market home page
![]() Exercise 21 - To add horizontal rules to the Central Valley Farmers’ Market
home page
Exercise 21 - To add horizontal rules to the Central Valley Farmers’ Market
home page
![]() Exercise 22 - To add a contact information page to the Central Valley
Farmers’ Market home page
Exercise 22 - To add a contact information page to the Central Valley
Farmers’ Market home page
![]() Exercise 23 - To add a link from the Central Valley Farmers’ home page
to contact page
Exercise 23 - To add a link from the Central Valley Farmers’ home page
to contact page
![]() Exercise 24 - To add a mailto link from the Farmers’ contact page
Exercise 24 - To add a mailto link from the Farmers’ contact page
![]() Exercise 26 - To add keywords and description meta elements on the Farmers’
Market Home page
Exercise 26 - To add keywords and description meta elements on the Farmers’
Market Home page
![]() Exercise 27 - To add a robots
element to the Farmers’ Market Home page
Exercise 27 - To add a robots
element to the Farmers’ Market Home page
![]() Exercise 28 - To add the content-type
element and then validate the documents
Exercise 28 - To add the content-type
element and then validate the documents
![]() EXERCISE 1 - Create a basic
HTML Page
EXERCISE 1 - Create a basic
HTML Page
1. Start your text editor and create a new document, if necessary.
2. Type the following tags to begin the HTML document.
Remember that all HTML documents must begin and end with the <html>…</html>
tag pair.
<html>
</html>
3. Add the following <head> and <title> tags between the <html>…<html> tag
pair. The title will appear in your Web browser’s title bar. Remember that
the <head>…</head> tag pair must include the <title>…</title> tag pair.
<head>
<title>Web Page Example</title>
</head>
4. Next, add the following document body tags above the closing </html> tag:
<body>
</body>
5. Type the following tags and text between the <body>…</body> tag pair to
create the body of the HTML document.
<h1>This line uses the heading 1 tag</h1>
<p>This line includes <br> a line break</p>
<p>The following line is a horizontal rule</p>
<hr>
<h2>This line uses the heading 2 tag</h2>
<h3>This line uses the heading 3 tag</h3>
<p>This <b>line</b> <i>contains</i> <sup>text</sup>
<sub>formatting</sub></p>
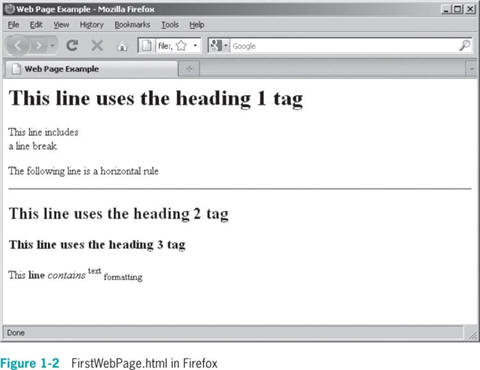
6. Save the file as FirstWebPage.html
in your folder. Some text editors automatically add their own extension to a
document. Notepad for instance, adds an extension of .txt. Be sure your
document is saved with the extension .html.
7. Close the FirstWebPage.html file and then open it in Firefox or your favourite
browser by selecting Open File from the File menu or by simply clicking on
the file in your folder. Figure below shows what it should look like.
8. Close your web browser window.
![]() Exercise 2 - Creating a HTML file without all required Tags
Exercise 2 - Creating a HTML file without all required Tags
1.
Start your text editor and create a new document.
2.
Without including any <html>,
<head>,
or <body>
tags, type the following statements. Notice that the closing tags are
missing for the <p> tags and
the last <b> tag.
<h1>Understanding Client/Server
Architecture </h1>
<p>To be successful in Web
development, you need to understand the basics of client/server
architecture. There are many definitions of the terms <i>client</i> and
<i>server</i>. In traditional client/server architecture, the <b>server</b>
is usually some sort of database from which a client requests information.
<p>from <i>JavaScript 5th
Edition</i><br>
by <b>Don Gosselin
6.
Save the file as Architecture.html
in your folder.
7.
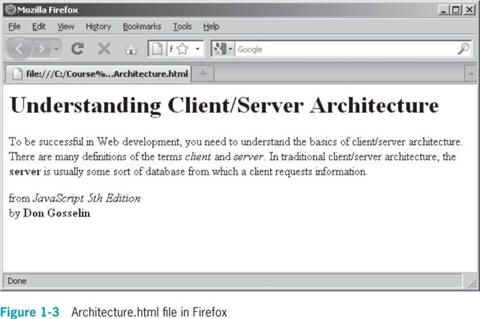
Close the Architecture.html file
and then open it in Firefox or your favourite browser. Even though the HTML
document does not include all of the required tags, the web browser displays
it properly, as the figure below shows.
8.
Close your web browser window
![]() Exercise 3 - Creating an XML Document that contains your mailing address
Exercise 3 - Creating an XML Document that contains your mailing address
1.
Start your text editor and create a new document.
2.
Add the following XML declaration that includes the version,
encoding, and standalone attributes:
<?xml version="1.0"
encoding="iso-8859-1"
standalone="yes"?>
3.
Type the following opening tag to begin the document:
<Mailing_Address>
4.
Next add the following elements that contain your mailing address. Be sure
to replace the text within each tag pair with your own information.
<Name>your name</Name><Address>your
address</Address>
<City>your city</City><State>your
state</State>
<Zip>your zip code</Zip>
5.
Type the closing mailing address tag, as follows:
</Mailing_Address>
6.
Save the file as MailingAddress.xml
in your folder.
7.
Close the file in your text editor.
![]() Exercise 4
- Creating an XML Document that stores data
Exercise 4
- Creating an XML Document that stores data
1.
Start your text editor and create a new document.
2.
Type the XML declaration, as follows:
<?xml version="1.0"
encoding="ISO-8859-1" standalone="yes"?>
3.
Next type the opening and closing tags for a root element named <books>:
<books>
</books>
4.
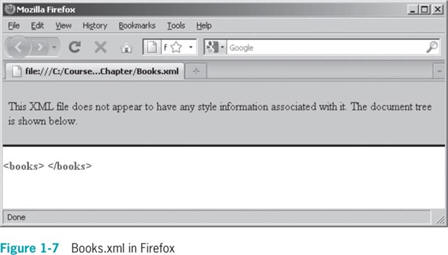
Save the file as Books.xml in
your chapter 1 folder.
5.
Open the file in your browser.
It should appear as the figure below shows.
6.
Close your web browser window.
![]() Exercise 5 - Introducing a case error into the books.xml document
Exercise 5 - Introducing a case error into the books.xml document
1.
Start your text editor and reopen books.xml
2.
Modify the closing </books> tag
so it is uppercase. Your file should appear as follows:
<?xml version="1.0"
encoding="ISO-8859-1" standalone="true"?>
<books>
</BOOKS>
3.
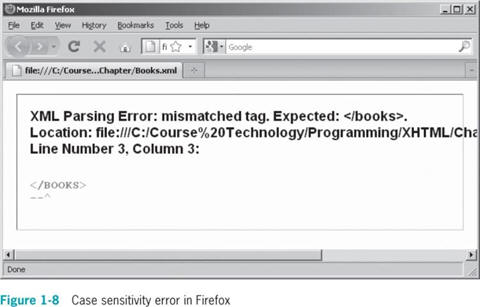
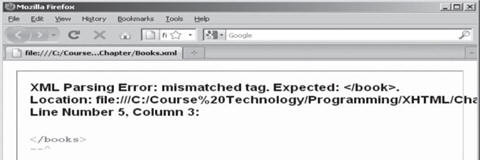
Save the file as Books.xml and
open in a browser. You should receive an error like the one shown below. As
you can see, the closing
</BOOKS>
tag does not match start tag.
4.
Return to the Books.xml file in your text editor and change the
</BOOKS>
tag
back to lowercase letters and save the file.
5.
Return to the web browser window that displays the books.xml file and
refresh the windows. The file should open correctly.
6.
Close your web browser window.
![]() Exercise 6 - To add two <book> elements to the books.xml file
Exercise 6 - To add two <book> elements to the books.xml file
1.
Start your text editor and reopen books.xml and modify the document as
follows to include two <book> elements. Be sure to add the elements within
the <books> root element. For now, do not include the closing
</book>
tag.
<?xml version="1.0"
encoding="ISO-8859-1" standalone="yes"?>
<books>
<book>A Farewell to Arms
<book>Of Mice and Men
</BOOKS>
3.
Save the file as Books.xml and
open in a browser. You should receive an error like the one shown below. As
you can see, the error is raised because the browser cannot find the ending
tag for the <book>
elements.
4.
Return to the Books.xml file in your text editor and add the closing </book>
tags to each of the <book> elements and save the file.
<?xml version="1.0"
encoding="ISO-8859-1" standalone="yes"?>
<books>
<book>A Farewell to Arms</book>
<book>Of Mice and Men</book>
</BOOKS>
5.
Return to the web browser window that displays the books.xml file and
refresh the windows. The file should open correctly like below.
![]() Exercise 7 -To modify the books.xml file to include nested elements
Exercise 7 -To modify the books.xml file to include nested elements
1.
Start your text editor and reopen books.xml
2.
Replace the <book>
element for A Farewell to Arms
with the following nested elements that contain information on the book’s
title and author. Notice that the
<title>
and <author>
elements are nested within the
<book>
element, and that the
<first)name>
and <last_name>
elements are nested within the author element.
<book>
<title>A Farewell to Arms</title>
<author>
<first_name>Ernest</first_name>
<last_name>Hemingway</last_name>
</author>
</book>
3.
Next, replace the <book> element for
Of Mice and Men with the following nested elements:
<book>
<title>Of Mice and Men</title>
<author>
<first_name>John</first_name>
<last_name>Steinbeck
</last_name>
</author>
</book>
4.
Save the Books.xml file and then open it. Your screen should look like
below.

![]() Exercise 8 - To add a publisher attribute to each of the <book> elements
Exercise 8 - To add a publisher attribute to each of the <book> elements
1.
Start your text editor and reopen books.xml
2.
Modify the opening tag for the A
Farewell to Arms <book>
element so it includes the publisher attribute with an assigned value of
“Scribner”:
<book publisher=”Scribner”>
3.
Modify the opening tag of the Of Mice
and Men <book> element so it includes the publisher attribute with an
assigned value of “Penguin”:
<book publisher=”Penguin”>
4.
Save the Books.xml file and then open it in a browser. Your screen should
look like the figure below.

5.
Close your web browser window.
![]() Exercise 9 - To add a publisher attribute to each of the <book> elements
Exercise 9 - To add a publisher attribute to each of the <book> elements
1.
Start your text editor and reopen books.xml
2.
Add a nested empty publication element to the A Farewell to Arms <book>
element as follows:
<book publisher="Scribner">
<publication year="1929"/>
<title>A
Farewell to Arms</title>
<author>
<first_name>Ernest</first_name>
<last_name>Hemingway</last_name>
</author>
</book>
3.
Now add a nested empty publication element to the Of Mice and Men <book>
element as follows:
<book publisher="Penguin">
<publication
year="1937"/>
<title>Of Mice and Men</title>
<author>
<first_name>John</first_name>
<last_name>Steinbeck</last_name>
</author>
</book>
4.
Save the Books.xml file and then open it in a browser. Your screen should
look like the figure below.
5.
Close your web browser window.
![]() Exercise 10 - To create a document that uses the Transitional DTD
Exercise 10 - To create a document that uses the Transitional DTD
1.
Start your text editor and create a new document
2.
Type the opening
<!DOCTYPE>
declaration that uses the Transitional DTD, as follows:
<!DOCTYPE html PUBLIC "-//W3C//DTD
XHTML 1.0 Transitional//EN"
"http://www.w3.org/TR/xhtml1/DTD/xhtml1-transitional.dtd">
3.
Type the <html> element as follows. Remember that all Web pages must begin
and end with the <html>…</html> tag pair.
<html>
</html>
4.
Within the <html>
element, add the following
<head>
and
<title>
elements to the document. The title appears in the Web Browser’s title bar.
Remember that the <head>
element must include a
<title>
element. The <title>
element cannot exist outside the
<head>
element
<head>
<title>Great American Novel</title>
</head>
5.
Next, add the following <body> element above the closing </html> tag.
<body>
</body>
6.
Type the following elements and text between the
<body>…</body>
tag pair to create the body of the document.
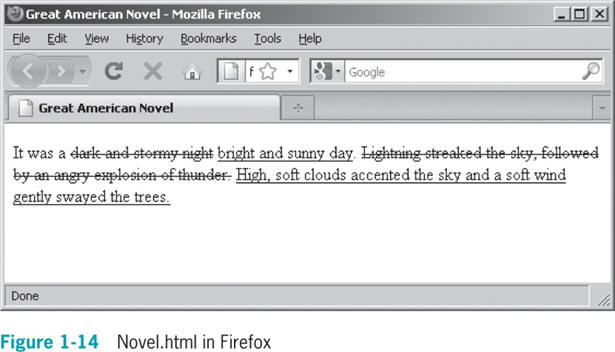
<p> It was a <s>dark and stormy night</s>
<u>bright and sunny day</u>
<s>Lightning streaked the sky, followed by an angry explosion of thunder.</s>
<u>High, soft clouds accented the sky and a soft wind gently swayed the trees.</u>
</p>
7.
Save the file as Novel.html and then open it in a browser. Your screen
should look like the figure which follows.
8.
Close your web browser window.
![]() Exercise 11 - To start creating the home page for the Don’s Pizza Web Site
Exercise 11 - To start creating the home page for the Don’s Pizza Web Site
<!DOCTYPE html
PUBLIC "-//W3C//DTD XHTML 1.0
Strict//EN"
"http://www.w3.org/TR/xhtml1/DTD/xhtml1-strict.dtd">
<html
xmlns="http://www.w3.org/1999/xhtml">
2.
Type the <html> element as follows. Remember that all Web pages must begin
and end with the <html>…</html> tag pair.
<html>
</html>
3.
Within the <html>
element, add the following
<head>
and
<title>
elements to the document. The title appears in the Web Browser’s title bar.
Remember that the <head>
element must include a <title> element. The
<title>
element cannot exist outside the <head> element
<head>
<title>Don’s Pizza Home Page</title>
</head>
4.
Next, add the following <body> element above the closing </html> tag.
<body>
</body>
5.
Type the following elements and text between the <body>…</body> tag pair to
create the body of the document.
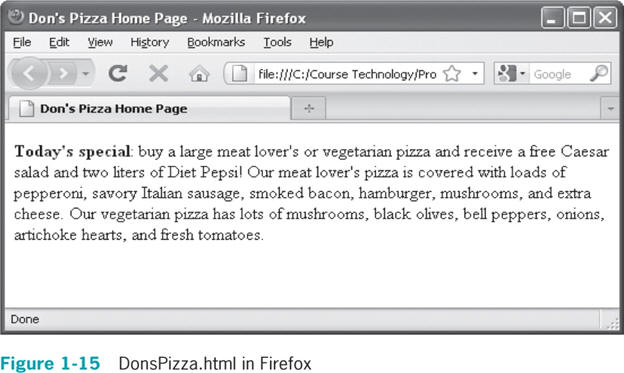
<p><b>Today's special</b>: buy a
large meat lover's or vegetarian pizza and receive a free Caesar salad and
two liters of Diet Pepsi! Out meat lover's pizza is covered with loads of
pepperoni, savory Italian sausage, smoked bacon, hamburger, mushrooms, and
extra cheese. Our vegetarian pizza has lots of mushrooms, black olives, bell
peppers, onions, artichoke hearts, and fresh tomatoes. </p>
6.
Save the file as DonsPizza.html and then open it in a browser. Your screen
should look like the figure below.
7.
Close your web browser window.
![]() Exercise 12 -To start creating the home page for the Don’s Pizza Web Site
Exercise 12 -To start creating the home page for the Don’s Pizza Web Site
1.
Start your text editor and create a new document and type the opening
<!DOCTYPE> declaration that uses the Strict DTD, as follows:
<!DOCTYPE html
PUBLIC "-//W3C//DTD XHTML 1.0
Strict//EN"
"http://www.w3.org/TR/xhtml1/DTD/xhtml1-strict.dtd">
<html
xmlns="http://www.w3.org/1999/xhtml">
2.
Type the <html> element as follows. Remember that all Web pages must begin
and end with the <html>…</html> tag pair.
<html>
</html>
3.
Within the <html> element, add the following <head> and <title> elements to
the document. The title appears in the Web Browser’s title bar. Remember
that the <head> element must include a <title> element. The <title> element
cannot exist outside the <head> element
<head>
<title>Don’s Pizza Home Page</title>
</head>
4.
Next, add the following <body> element above the closing </html> tag.
<body>
</body>
5.
Type the following elements and text between the <body>…</body> tag pair to
create the body of the document.
<p><b>Today's special</b>: buy a
large meat lover's or vegetarian pizza and receive a free Caesar salad and
two liters of Diet Pepsi! Out meat lover's pizza is covered with loads of
pepperoni, savory Italian sausage, smoked bacon, hamburger, mushrooms, and
extra cheese. Our vegetarian pizza has lots of mushrooms, black olives, bell
peppers, onions, artichoke hearts, and fresh tomatoes. </p>
6.
Save the file as DonsPizza.html and then open it in a browser. Your screen
should look like the figure below.

7.
Close your web browser window.
![]() Exercise
13 -To add comments to the DonsPizza.html file
Exercise
13 -To add comments to the DonsPizza.html file
1.
Start your text editor and open DonsPizza.html.
2.
At the top of the file, above the <!DOCTYPE> declaration, add the following
comments. Be sure to use your name and today’s date.
<!- -
Home page for Don’s Pizza
Your name
Today’s date - - >
NOTE: The above dashes should be the dash above keyboard letter p
repeated twice…..
3.
Save DonsPizza.html and then open it in a browser to confirm your comments
do not appear.
4.
Close your web browser window.
![]() Exercise 14 - To validate a file
Exercise 14 - To validate a file
1.
Start your text editor and open DonsPizza.html.
2.
Add the following <meta> element immediately above the closing </head> tag:
<meta http-equiv="Content-Type"
content="text/html; charset=iso-8859-1" />
3.
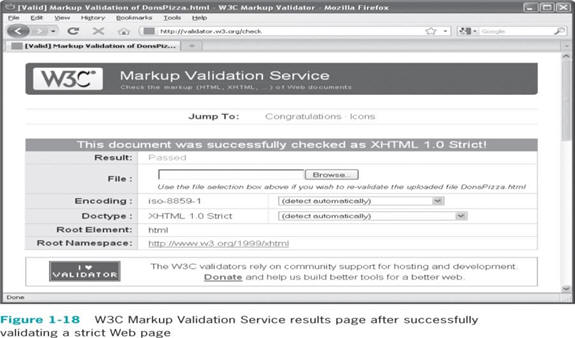
Start your Web browser and enter the URL for the W3C Markup Validation
Service Upload Page in the address box:
http://validator.w3.org/#validate_by_upload
4.
Click the browse button to
display the Choose file dialog box.
5.
In the Choose file dialog box, navigate to where you saved the
DonsPizza.html file. Locate and
open the file. The drive folder path and filename should appear in the File
Text box on the upload page.
6.
Click the Validate This File
Button. The W3C Markup Validation Service validates the document and returns
the results displayed below.
7.
Close your web browser window.
![]() Exercise 15 -
To start creating the home page for the Central Valley Farmers Market Web
Site
Exercise 15 -
To start creating the home page for the Central Valley Farmers Market Web
Site
1. Create a new document in your text editor (such as notepad++) and type
the opening
<!DOCTYPE>
declaration that uses the HTML DTD as follows:
<!DOCTYPE HTML>
2. Type the <html> element as follows:
<html>
</html>
3. Within the <html> element, add the following <head> and <title> elements
to the document.
<head>
<title>Central Valley Farmers’ Market Web</title>
</head>
4. Next, add the following document
<body>
element within the
<html>
element:
<body>
</body>
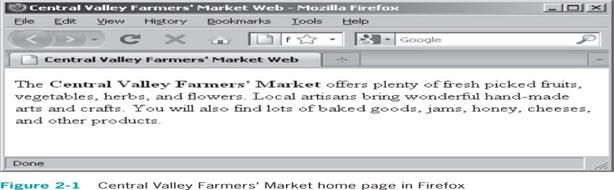
5. Add the following elements to the document body (between the
<body>…</body> tags). Notice that the text and inline <b> elements are
contained within a block-level <p> element.
<p> The <b>Central Valley Farmers’ Market</b> offers plenty of fresh picked
fruits, vegetables, herbs and flowers. Local artisans bring wonderful hand
made arts and crafts. You will also find lots of baked goods, jams, honey,
cheeses, and other products. </p>
6. Save the file as index.html in
your folder.
7. Open the index.html file in your browser. Figure below shows file as in
appears in Firefox.
8. Close your web browser window.
![]() Exercise 16 - To add standard attributes to the Central Valley Farmers’
Market home page
Exercise 16 - To add standard attributes to the Central Valley Farmers’
Market home page
1.
Return to the index.html file in
your text editor.
<!DOCTYPE HTML>
2.
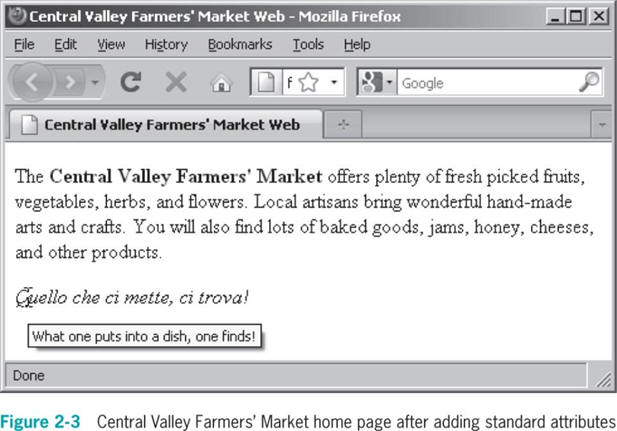
Just above the closing </body> tag, add the following<p> element that
contains the Italian phrase. The <p> element also includes the lang, dir and
title attributes.
<p title=”What one puts into a dish,
one finds!”
Lang =”it” dir=”ltr”><i>Quello che
ci mette, ci trova!</i></p>
3.
Save the index.html file and then
open it in your web browser. Figure below displays the index.html file as in
appears in Firefox.
4.
Close your web browser window.
![]() Exercise 17 - To add heading elements to the Central Valley Farmers’ Market
home page
Exercise 17 - To add heading elements to the Central Valley Farmers’ Market
home page
1.
Return to the index.html file in
your text editor.
2.
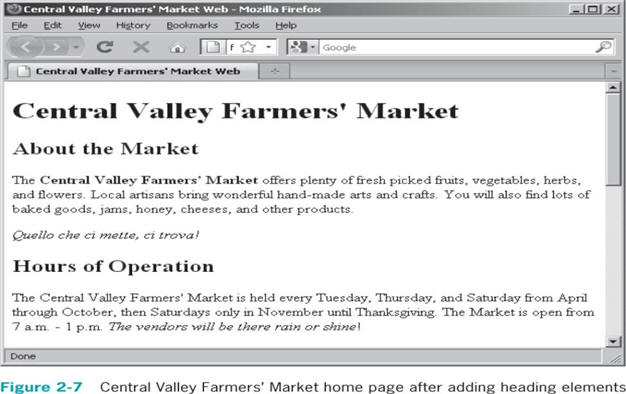
Add the following <h1> and <h2> elements as the first elements in the body
section, after the opening <body> tag but before the first <p> tag.
<h1>Central Valley Farmers’
Market</h1>
<h2>About the Market</h2>
3.
At the end of the body section, add the following <h2> element that lists
the hours of operation:
<h2>Hours of Operation</h2>
<p>The Central Valley Farmers' Market is held every Tuesday, Thursday, and
Saturday from April through October, then Saturdays only in November until
Thanksgiving. The Market is open from 7 a.m. - 1 p.m. <i>The vendors will be
there rain or shine</i>!</p>
4.
At the end of the body section, add the following <h2> and <h3> elements
that list this week’s featured vendors:
<h2>Featured Vendor List</h2>
<p>Be sure to visit this week's
featured vendors.</p>
<h3>Big Creek Produce</h3>
<p>Offers a diverse selection of
produce including
restaurant-quality vegetables and
edible flowers. </p>
<h3>Blue Sky Gardens</h3>
<p>Grows a variety of organic
vegetables including French slenderette green beans, spinach, salad greens,
squash, pumpkins, and cherry tomatoes, as well as a vast array of fresh-cut
and dried flowers.</p>
<h3>Maple Ridge Farms</h3>
<p>Specializes in organically grown
lettuces, arugula, red mustard, and other greens.</p>
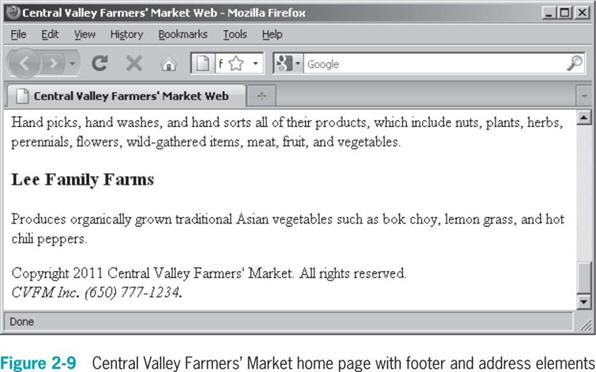
<h3>Manzi Produce</h3>
<p>Hand picks, hand washes, and hand
sorts all of their products, which include nuts, plants, herbs, perennials,
flowers, wild-gathered items, meat, fruit, and vegetables.</p>
<h3>Lee Family Farms</h3>
<p>Produces organically grown
traditional Asian vegetables such as bok choy, lemon grass, and hot chili
peppers.</p>
5.
Save the index.html file and then
open it in your web browser. Figure below displays the index.html file as in
appears in Firefox.

6.
Close your web browser window.
![]() Exercise 18 - To add section elements to the Central Valley Farmers’ Market
home page
Exercise 18 - To add section elements to the Central Valley Farmers’ Market
home page
1.
Return to the index.html file in
your text editor.
2.
Enclose the hours of operation and Featured Vendors List
<h2>
heading elements and the paragraphs which follows them with section elements
as follows:
<section>
<h2>Hours of Operation</h2>
<p>The Central Valley Farmers' Market is held every Tuesday, Thursday, and Saturday from April through October, then Saturdays only in November until Thanksgiving. The Market is open from 7 a.m. - 1 p.m.
<i>The vendors will be there rain or
shine</i>!</p>
<h2>Featured Vendor List</a>
<p>Be sure to visit this week's
featured vendors.</p>
</section>
3.
Enclose the <h3>
heading elements and the paragraphs which follows them with section elements
as follows:
<section>
<h3>Big Creek Produce</h3>
<p>Offers a diverse selection of
produce including
restaurant-quality vegetables and
edible flowers. </p>
<h3>Blue Sky Gardens</h3>
<p>Grows a variety of organic
vegetables including French slenderette green beans, spinach, salad greens,
squash, pumpkins, and cherry tomatoes, as well as a vast array of fresh-cut
and dried flowers.</p>
<h3>Maple Ridge Farms</h3>
<p>Specializes in organically grown
lettuces, arugula, red mustard, and other greens.</p>
<h3>Manzi Produce</h3>
<p>Hand picks, hand washes, and hand
sorts all of their products, which include nuts, plants, herbs, perennials,
flowers, wild-gathered items, meat, fruit, and vegetables.</p>
<h3>Lee Family Farms</h3>
<p>Produces organically grown
traditional Asian vegetables such as bok choy, lemon grass, and hot chili
peppers.</p>
</section>
4.
Save the index.html file and then
open it in your web browser. Figure which follows displays the index.html
file as in appears in Firefox. (note it should look the same as before).
6.
Close your web browser window.
![]() Exercise 19 - To add header and footer elements to the Central Valley
Farmers’ Market home page
Exercise 19 - To add header and footer elements to the Central Valley
Farmers’ Market home page
1.
Return to the index.html file in
your text editor.
2.
Enclose the first <h2>
heading elements and the two paragraphs which follows them in a header
element as follows:
<header>
<h2>About the Marke</h2>
<p>The <b>Central Valley Farmers'
Market</b> offers plenty of fresh picked fruits, vegetables, herbs, and
flowers. Local artisans bring wonderful hand-made arts and crafts. You will
also find lots of baked goods, jams, honey, cheeses, and other products.</p>
<p title="What one puts into a dish,
one finds!" lang="it" xml:lang="it" dir="ltr"><i>Quello che ci mette, ci
trova!</i></p>
</header>
3.
Add the following footer elements to the end of the document.
<footer>Copyright 2011 Central
Valley Farmers' Market. All rights reserved.
</footer>
4.
Save the index.html file.
1.
Return to the index.html file in
your text editor.
2.
Enclose the first <h2>
heading elements and the two paragraphs which follows them in a header
element as follows:
<footer>Copyright 2011 Central
Valley Farmers' Market. All rights reserved.
<address>CVFM Inc. (650)
777-1234</address>
</footer>
3.
Save the index.html file and open
it in your web browser. It should look like the diagram below:
4.
Close your browser window.
![]() Exercise 21 - To add horizontal rules to the Central Valley Farmers’ Market
home page
Exercise 21 - To add horizontal rules to the Central Valley Farmers’ Market
home page
1.
Return to the index.html file in
your text editor.
2.
Add horizontal rules above each of the
<h2>
elements. You should add three
<hr />
elements in total.
3.
Save the index.html file and open
it in your web browser. It should look like the diagram below with
horizontal rules above About the Market and Hours of Operation headings.
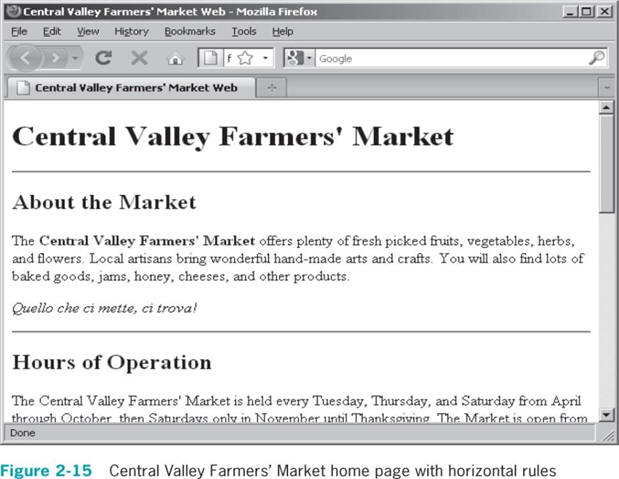
4.
Close your browser window.
![]() Exercise 22 - To add a contact information page to the Central Valley
Farmers’ Market home page
Exercise 22 - To add a contact information page to the Central Valley
Farmers’ Market home page
1.
Create a new document in your text editor.
2.
Type the <!DOCTYPE>
declaration, <html>
element, document head, and the
<body>
element. Use the HTML DTD and “Contact Information for the Central Valley
Farmers Market” as the content of the
<title>
element. Your document should appear as follows:
<!DOCTYPE HTML>
<html>
<head>
<title>Contact Information for the
Central Valley Farmers' Market</title>
</head>
<body>
</body>
</html>
3.
In the document body, add the following headings and address element that
list the contact information for the Central Valley Farmers’ Market.
<h1>Central Valley Farmers'
Market</h1>
<h2>Contact Information</h2>
<address>
<p>If you have any questions or
concerns about the CentralValley Farmers' Market, please call (908)
626-3764.<br />
You can also send mail to the
Central Valley Farmers' Market at the following address:</p>
<p>P.O. Box 135<br />
Central Valley, CA 94359</p>
<p>You can send an e-mail to
<a href="mailto:your_email_address">
Your e-mail address</a>.</p>
</address>
4.
At the end of the body section, add the following statement that creates a
link back to the home page for the Central Valley Farmers’ Market:
<p><a href=”index.html”>Home</a></p>
5.
Save the file as Contact.html.
Next you add a link from the Central Valley Farmers’ Market home page to the
contact information page.
![]() EXERCISE 23 - To add a link from the Central Valley Farmers’ home page to
contact page
EXERCISE 23 - To add a link from the Central Valley Farmers’ home page to
contact page
1.
Return to the index.html file in
your text editor.
2.
Place the insertion point after the closing
</h1>
tag, press Enter, and then type
the following elements that create a link to the contact.html document:
<p><a href=”contact.html”>Contact
Information</a></p>
3.
Save the index.html file and then
open it in a web browser and click the
Contact Information link. The
contact.html file should open in your browser window.
4.
Click the Home link to return to
the home page for the Central Valley Farmers’ Market.
5.
Close your Web browser window.
![]() Exercise 24 - To add a mailto link from the Farmers’ contact page
Exercise 24 - To add a mailto link from the Farmers’ contact page
1.
Return to the contact.html file
in your text editor.
2.
Place the insertion point after the closing </address> tag, press
Enter, and then type the
following element that creates a mailto link. Be sure to enter your email
address.
<p>You can send an e-mail to
<a href="mailto:your_email_address">
Your e-mail address</a>.</p>
3.
Save the contact.html file and
then open the index.html it in a
web browser. Click the Contact
Information link, then click the mailto link on the contact.html page
and try sending yourself an email message.
4.
Close your Web browser window.
![]() Exercise
25 - To add links to the <h2> elements on
the Farmers’ Market Home page
Exercise
25 - To add links to the <h2> elements on
the Farmers’ Market Home page
1.
Return to the index.html file in
your text editor.
2.
Place the insertion point after the closing </p> tag in the statement that
creates the Contact Information link, press
Enter, and then add the following bookmark links to the documents
heading level 2 elements. Also enclose all four paragraphs in a <nav>
section.
<nav>
<p><a href="contact.html">Contact
Information</a></p>
<p><a href="#am1">About the
Market</a></p>
<p><a href="#ho1">Hours of
Operation</a></p>
<p><a href="#fvl1">Featured Vendor
List</a></p>
</nav>
3.
Modify the About the Market heading element so it includes an <a> element
with the same id attribute that you added to the bookmark element:
<h2><a id=”am1”>About the
Market</a></h2>
4.
Modify the Hours of Operation heading element so it includes an <a> element
with the same id attribute that you added to the bookmark element:
<h2><a id=”ho1”>Hours of
Operation</a></h2>
5.
Modify the Featured Vendor List heading element so it includes an <a>
element with the same id attribute that you added to the bookmark element:
<h2><a id=”fvl1”>Featured Vendors
List</a></h2>
6.
Save the index.html file and then
open it in a web browser and test the new links. The next figure shows how
the new bookmark links should appear.
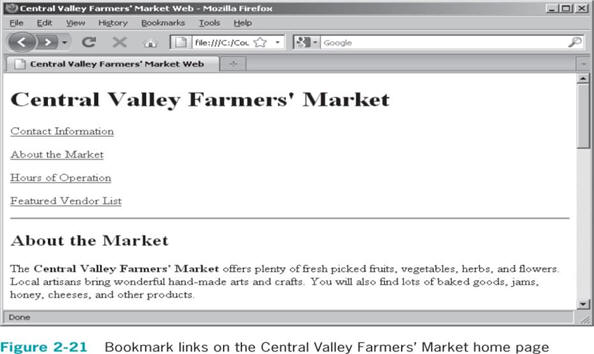
7.
Close your Web browser window.
![]() Exercise 26 - To add keywords and description meta elements on the Farmers’
Market Home page
Exercise 26 - To add keywords and description meta elements on the Farmers’
Market Home page
1.
Return to the index.html file in
your text editor.
2.
Above the closing </head> tag, add the following <meta> element that creates
the description meta element:
<meta name="description"
content="The Central Valley Farmers' Market sells fresh produce, hand-made
crafts, baked goods, and a variety of other products." />
3.
After the description <meta> element, add the following keyword <meta>
element:
<meta name="keywords"
content="market, farmers' market, organic produce, fresh produce,
vegetables, fruit, herbs,crafts, baked goods" />
4.
Save the index.html file.
![]() Exercise 27 - To add a robots <meta> element to the Farmers’ Market Home
page
Exercise 27 - To add a robots <meta> element to the Farmers’ Market Home
page
1.
Return to the index.html file in
your text editor.
2.
Above the closing </head>
tag, add the following <meta>
element that creates the robot
<meta>
element that allows spiders to index the page but not to follow any links on
the page:
<meta name="robots" content="index,
nofollow" />
3.
Save the index.html file.
![]() Exercise 28 - To add the content-type <meta> element and then validate the
documents
Exercise 28 - To add the content-type <meta> element and then validate the
documents
1.
Return to the index.html file in
your text editor. Above the closing
</head>
tag, add the following <meta>
element that creates a content-type meta tag that specifies a MIME type of
text/html and a character set of UTF-8.
<meta http-equiv="content-type"
content="text/html; charset=utf-8" />
2.
Save and close the index.html
file.
3.
Return to the contact.html file
and add a content-type <meta> element above its closing
</head>
tag.
4.
Save and close the contact.html
file.
5.
Start your web browser and enter the URL for the upload page of the W3C
Markup Validation Service:
http://validator.w3.org/#validate_by_upload. Open and validate the
index.html and
contact.html files. If you
receive any warnings or errors, fix them and revalidate the documents.
6.
Close your web browser.